In digest: week ending 7 February 2016

It was a rare week in our kitchen – all the main-meal dishes of food we prepared were tried and true favourites. No recipe discoveries. No experiments. No radical departures. Just a series of palate-pleasing, reliable regulars. Think barbecued beef steak, Weber-roasted pork belly, barbecued chicken thigh fillets, veal schnitzel and chargrilled calamari. Although, if we were vegetarians, the zucchini-and-feta-fritter innovation would count as the base on which to build a main meal.

No, last week, our quest for ‘new’ was channelled into home-furnishing, with the installation of modern interior shutters on our four largest windows.

IMG_2393

And, on top of that, our dance-card was particularly congested: lots of late-season produce to process – green tomatoes converted to pickle, figs to jam and basil to pesto; and five days of looking after our grand-dog, Stevie Nicks.

Trainee kitchen hand

Trainee kitchen hand

Tomorrow, Stevie will head home to Healesville, along with a batch of a rare summer treat for her family – cold cucumber soup. But that, my friends, is a story for another day.

Posted in Cooking, Home life | Leave a comment

Further French forays, a food faux pas or five, and fresh fritters …

… following a fraught fortnight.

Maggie and I have just been through two weeks of anxiety and stress involving a health scare. Thankfully, an investigative procedure has found no evidence of anything life-threatening and, as of Saturday evening, we have stopped stress-eating and have resumed normal programming in our kitchen.

Prior to being probed, Maggie had to endure – exactly the correct word in her case – two days of plain food; or no food at all, unless you classify lemon-flavoured jelly as a food. So, she insisted that this brief period of purgatory be bookended by a feed of beef. As you do.

Naturellement, we turned to Mastering the art of French cooking for inspiration. The majority of the beef recipes are better suited to the cooler months of the year and involve much preparation and long, slow cooking. However, there were also some straightforward recipes for pan-fried fillets of beef accompanied by a sauce. We selected the bifteck au poivre, partly to compare the result with the dish of pepper steak that I have been making for 20 years.

The result was stunningly delicious. By following this recipe, we had acquired new knowledge and skills, ranging from the quantity and texture of the pepper, to preparing our pan (skillet) to cook the steaks, preparing the pan to make the sauce, ingredients for the sauce, and then making the sauce.

Here is my favourite lesson from this experience: when you are heating butter in which you intend to sear or brown a piece of meat, wait until the butter has almost finished foaming. Why? Because the foam is caused by evaporation of the water in the butter, and the temperature at which water boils is much less than the preferred temperature for the cooking process. D’accord?

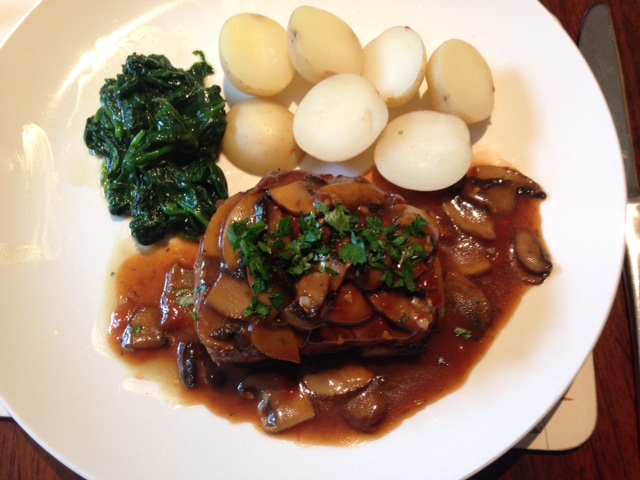
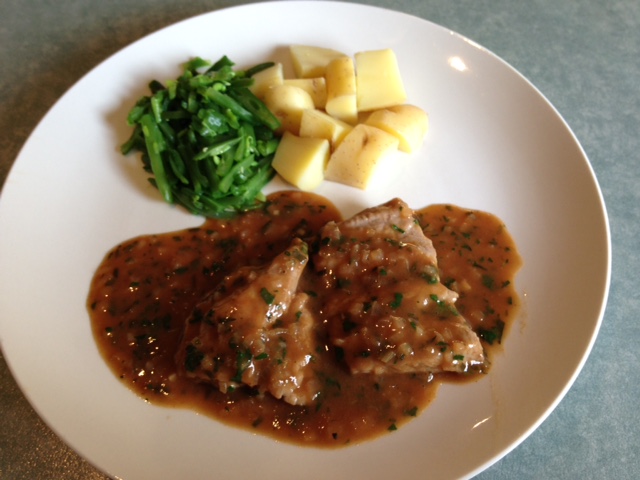
The next meal of beef – prepared after Maggie had received her good news and then enjoyed a deep recuperative snooze – used a recipe from the same genre. This time the steaks were served with a mushroom and madeira sauce (we substituted an Australian port-style wine for the madeira).

Again, the recipe worked very well and, although Maggie was impatient, born of hunger, to take her seat at the dinner table, I did persuade her to wait long enough for her to take a photo of my plate.

The book is justly renowned for its educative qualities, precision and detail. We can now vouch for that! In both cases, we made some minor modifications according to our personal tastes: we made more sauce than the recipes would have apportioned to our weight of meat; and we finished each sauce with a little cream, instead of butter.

Asparagus mushroom

For the next evening’s main meal, we had thawed out the small turkey breast that had spent the fortnight in the freezer, pending the upshot, sorry, outcome of Maggie’s procedure. We had decided to roast a piece of turkey during the festive season after all, inspired by what a friend had served to us at her home. So, we ordered a smallish breast from our favourite butcher, NOT from our preferred supplier of non-routine poultry. That was our first faux pas; more were to follow.

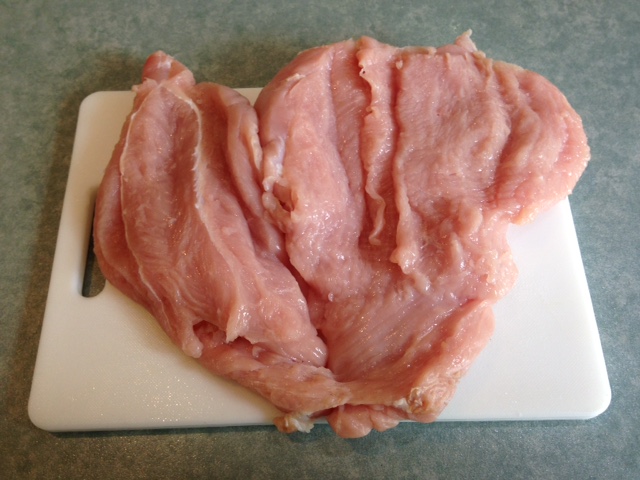
To prepare the turkey for cooking, Maggie lay the piece flat on its skin and then used a long, sharp knife to cut sideways into the two halves and open the meat up like the leaves of a fold-out book. This technique provides more surface area for a stuffing and reduces the thickness of the flesh to a more appealing scale.

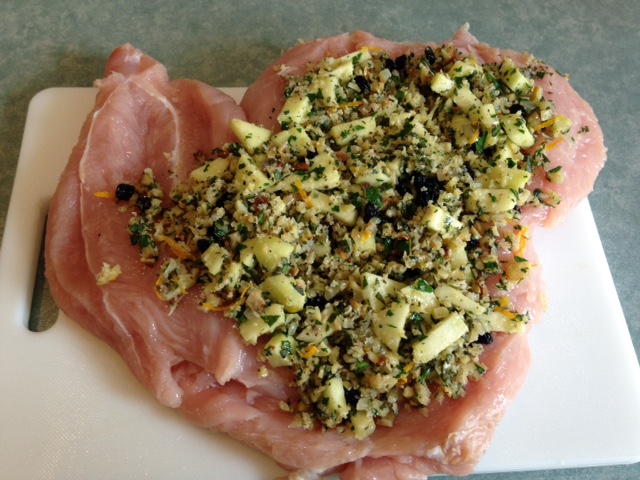
For the stuffing, we combined some brown shallot, finely chopped and sauteed in butter; breadcrumbs and chopped roasted chestnuts; a green apple, peeled, cored and chopped; chopped parsley, thyme and sage; orange zest; some dried currants and the warm orange juice in which they were softened; salt, pepper and olive oil; and an egg yolk. Maggie spread the stuffing over the flesh, rolled up the breast and secured it with kitchen string.

Turkey breast 1   Turkey breast 2

Turkey breast 3

So far, so good. What could possibly go wrong? Well, quite a lot, as it turned out.

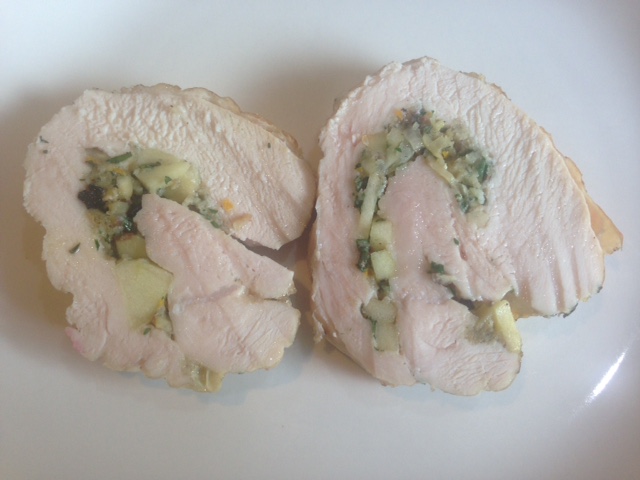
Based on previous successful experiences with a larger turkey breast, we roasted it for about 45 minutes. When we inserted a metal skewer into the flesh, the modest trickle of juices looked clear enough, so we agreed that it was cooked. However, if you look closely at the photo below of two of the slices we produced by cutting across the breast, you might just discern some pink flesh at the heart of each piece and you will certainly be able to see that the pieces of apple in the stuffing were still ‘entire’.

Turkey breast 4   Turkey breast 5

Diagnosis: I should have removed the stuffed breast from the fridge much earlier (first time I have made that mistake); it should have gone into a cold oven and slowly come up to temperature, rather than an oven that was still warm from baking a plum cake; the apple should have been grated; and the modest size of the breast was never going to require enough cooking time to transform the stuffing into an attractive element of the dish.

We made a tolerable meal with some of the meat that WAS properly cooked and, tonight, when we heat up the balance, we will take steps to remedy our mistakes. Not sure quite how, just yet, but I’m working on it.

Maggie returned to work the next morning, leaving me to contemplate the fate of some zucchini, which our wonderful Greek neighbours had given us, picked fresh from their garden.

For inspiration, I turned to one of our reliable cookbooks and found a simple recipe for a zucchini soup. I added a little extra complexity and produced a passable, blended soup which is destined to be frozen in tubs for our grand-daughter Iris.

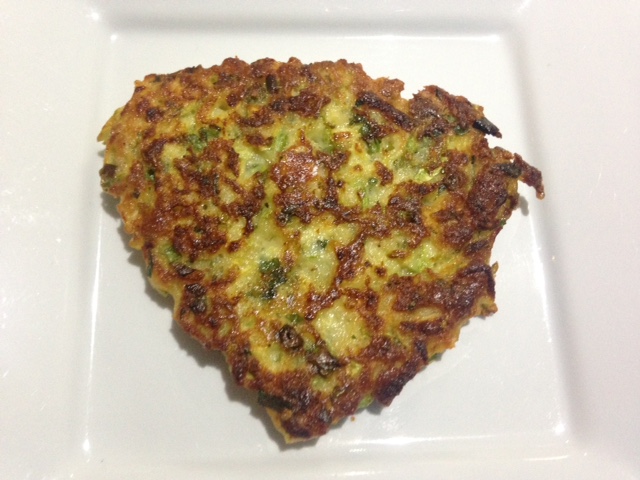
To use the balance of the zucchini, I took a recipe I had found for the cooking group I support at an aged-care facility and tweaked it in various ways to make it compatible with some lamb chops we planned to cook on our barbecue. Hence the (Greek) feta, fresh parsley and mint.

Ingredients

250g zucchini
60g self-raising flour
100g feta
green halves of 4 spring (green) onions, thinly sliced
1 egg
1 tbsp each of finely chopped parsley and mint
¼ tsp salt
pinch or two of cayenne pepper (or plenty of black pepper if you prefer)
fresh breadcrumbs (only if needed to make the mixture less wet)
olive oil, for cooking

Method

  1. Trim the ends from the zucchini and grate it. Place the zucchini in a tea-towel and squeeze out as much excess moisture as possible; repeat with a second towel.
  2. Transfer the zucchini to a bowl. Stir in self-raising flour, feta, spring onion, egg, herbs, cayenne pepper and salt.
  3. Heat a little olive oil in a non-stick frying pan over medium-high heat.
  4. Drop mounded dessertspoon measures of the zucchini mixture into the pan. Cook for 3-4 minutes each side or until golden and cooked through (they will still be moist in the middle but not raw).
  5. Transfer to a plate lined with paper towel.
  6. Repeat steps 4 and 5 with the remaining zucchini mixture.

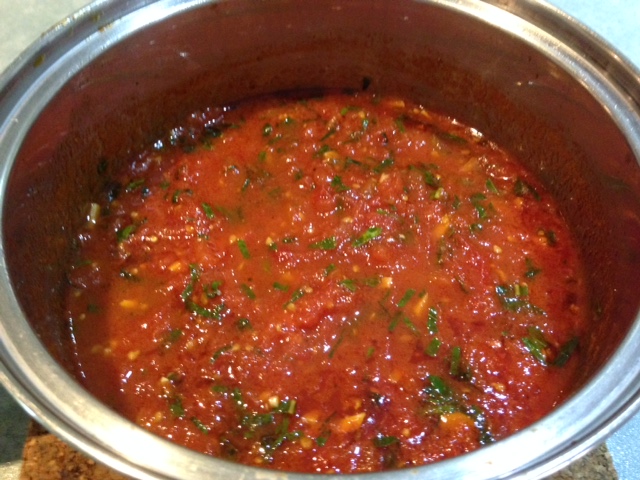
The recipe is enough to produce eight fritters, about 8cm square and 5-6mm thick. We accompanied them with a simple salsa of chopped ripe tomatoes, chopped basil leaves, seasoning and a splash of balsamic vinegar.

Zucchini fritter

Posted in Cooking | Tagged , , , , | Leave a comment

More Moorish

In August 2015, I published a post about chicken marylands that we had marinated with Moroccan flavours and then roasted in our Weber Q. Last week, we prepared another batch of the marinade and applied it to a small chicken, known variously as poussin or spatchcock.

On this occasion, we also baked a medley of root vegetables: sweet potato, peeled, cut into chinks and par-boiled for 3 minutes; baby beetroot, boiled whole until just becoming tender at the surface, then peeled and cut into chunks; and some leftover pieces of kipfler potato, which had been boiled, drained and tossed with salt, pepper, olive oil, parsley and spring (green) onion to make a warm salad the previous evening.

Moorish poussin 1   Moorish poussin 2

Moorish poussin 3

The end result was superior to what we had achieved using the marylands, for two reasons: the garlic was fresh and grown locally; and the meat was sweeter. The vegetable medley was a delicious mixture of sweet and savoury and a spinach and walnut salad completed the dish.

Posted in Cooking | Tagged , , , , , | Leave a comment

At the base of the J-curve

So, as of Christmas Day 2015, I am the happy owner of Mastering the Art of French Cooking. Happy, despite the fact that this book was first published in 1961 and has not been updated since 1983. Happy, because watching Julie and Julia, the movie inspired by the book, always brings a smile to my face, an appetite to my stomach and a very strong desire to prepare a dish of French food.

But, with 524 recipes – I take the publisher’s word on this – where to begin? With sauces, of course, French cuisine’s unassailable legacy to the world’s cooks. These are to be found at the base of the J-for-Julia curve. To the left, there are aspics, savoury mousses and terrines; not sure we’re going to go there. To the right, up the long leg of the J, are soups, entrees, mains and desserts; many of these use a sauce.

So, working backwards, we looked for the first dish we would prepare and plate up and let it point us to a sauce recipe. We went to the section of escalopes de veau recipes, found one that included a sauce flavoured with tarragon – currently abundant in our kitchen garden – and that took us to brown sauce (1) (there are three versions of brown sauce and at least 10 further variations).

Tarragon 2016

The introduction to brown sauce (1) states “this is the best of the group and the one most nearly approaching the traditional demi-glace. Its preliminaries are somewhat exacting, and it requires at least two hours of simmering; the longer it cooks the better it will be.”

The recipe used 6 American cups of beef stock; we chose to scale it back to 2 cups, so one-third of the quantity for each ingredient. I won’t go into all the detail but I can report that, indeed, the longer it cooked, the better it was, coming together beautifully with respect to both consistency and flavour in the last 15 minutes of the two hours of simmering.

After deglazing the surface of the sauce, we used some to prepare Escalopes de veau a l’estragon, which, accompanied by some fresh beans and kipfler potatoes, looked like this:

Veal escalopes tarragon

We’re not convinced that the tarragon worked well with the veal – we normally use tarragon in partnership with chicken, eggs, fish and ham – but the sauce was otherwise delightful, with a richness that could not have been achieved by using a short-cut.

Inspired by this success, we made another batch of brown sauce yesterday, using twice as much volume of stock and other ingredients as the first time. This gave us double the reward for much the same effort. We also made a couple of minor variations to suit our own palates.

Allez!

Posted in Cooking | Tagged , , | Leave a comment

Into the closet: folio 2

Last August, I wrote about the fact that we had modernised ‘the little room’ in our home and then decided to decorate it with a rolling series of photos from our overseas travels.

The first series, selected from our visit to France in the northern winter of 2009/10, has recently been replaced with some photos from our first overseas trip, to Italy, early in the northern autumn of 2008. Here are the images that now adorn the walls of our WC:

Group 1

Colourful bistro cascading down a Taormina sidestreet

Colourful bistro cascading down a sidestreet in Taormina, Sicily

The brightly painted fishermen's houses of Burano island, Venice

The brightly painted fishermen’s houses of Burano island, Venice

Reflections in the rising tide, Piazza San Marco, Venice

Reflections in the rising tide waters, Piazza San Marco, Venice

Group 2

Paved streets, polished by the passing parade of pedestrians, Erice, Sicily

Paved streets, polished by the passing parade of pedestrians, Erice, Sicily

Seasonal display of chillies and garlic, Rialto Market, Venice

Seasonal display of chillies and garlic, Rialto Market, Venice

Group 3

Grand thoroughfare, Pompeii

Grand thoroughfare, Pompeii

Arena restoration at the colosseum, Rome

Arena restoration at the colosseum, Rome

Posted in Home life, Travel | Tagged , , , , , , , | 2 Comments

Christmas seafood recipes

As promised in my previous post, here are the recipes for the seafood dishes that we prepared to share with our family at Christmas.

Crayfish salad

Well, this wasn’t too difficult. The folks at Eat Fish had already cooked our magnificent King Island cray and cut it into halves. Maggie scooped all the flesh out, cut all the legs and claws off, piled the flesh decoratively into one of the shells and placed everything on a platter covered in lettuce leaves. The cocktail sauce was made using our tried and proven recipe.

Smoked trout and herb dip

Separating the trout flesh from the skin and bones is a fiddly task but the end result is worth it. If you store the dip in a fridge overnight, the flavour will develop further.

Ingredients

1 whole smoked trout
4 tbsp mayonnaise
3 tbsp light sour cream
2 tsp Dijon mustard
½ tsp ground black pepper
1 tbsp (20ml) chopped parsley
1 tbsp snipped chives
1 tsp chopped dill leaves or ¼ tsp chopped tarragon leaves (not essential)
generous squeeze of lemon juice
several drops of Tabasco sauce

Method

  1. Remove the skin, fins and head from the trout. Carefully remove the flesh from the bones. Pick through the flesh a second time to locate any remaining fine bones.
  2. Use your hands to break up the flesh into small pieces and place in a mixing bowl.
  3. Add mayonnaise, cream and mustard and combine well with a fork or spoon.
  4. Add pepper, herbs, lemon juice and Tabasco, mix together and taste to adjust the seasoning.
  5. Refrigerate briefly to regain thickness. Serve with crackers or vegetable crudités

Salmon carpaccio

I posted this recipe soon after my 60th birthday. The only change we made this time was to dice the tomatoes on Christmas Eve, season them with the salt, pepper and sugar; the bowl was covered and spent the night in the fridge. This step enhanced the flavour of the tomato, but it is still preferable to add the herbs to the salsa shortly before you serve the dish, so that each herb retains some of its distinctive flavour.

Salmon carpac 2   Salmon carpac 3

Chilli mussels

Once you’ve made this at home, you won’t need to order it from a restaurant menu; you can order something you haven’t tried before instead! We like to use the smaller mussels produced in and around Port Philip Bay, available fresh from good fishmongers.

Ingredients

1 kg fresh mussels
dry white wine
1 small onion, coarsely chopped
1 bay leaf
12 black peppercorns
1 tbsp olive oil
2 cloves garlic, finely chopped
¼ tsp chilli flakes or 1-2 chopped fresh chillies
2 tbsp tomato paste
400g can crushed or diced tomatoes (or equivalent quantity of tomato passata)
½ tsp sugar
½ cup dry white wine
salt and pepper to season
1 tbsp fresh basil, chopped

Method

  1. To prepare mussels for cooking, soak raw mussels in cold water for 10 minutes, scrub and remove the beard with a small sharp serrated knife.
  2. Meanwhile, sauté the garlic and chilli in olive oil for 2 minutes over low-to medium heat in a saucepan. Add tomato paste and stir for a further minute. Add tomatoes, sugar and white wine, cook briefly, adjust seasoning and simmer for 10-15 minutes. Remove from heat and add chopped basil.
  3. While the tomato and chilli sauce is simmering, place mussels no more than 2 layers deep in a wide pan. Scatter over some or all of a finely chopped small onion, a few peppercorns, a bay leaf, a sprig of thyme and enough dry white wine to cover the bottom of the pan by 1cm.
  4. Seal with a tight-fitting lid (close any steam vents), turn heat to maximum and wait 4 to 5 minutes. Remove from heat, lift lid and, using tongs, remove all the mussels that have opened. Place the pan back on the heat for 2 minutes and discard any mussels that have not opened at this second attempt.
  5. Remove one half of each mussel shell and place the remaining halves flesh-side up on wide bowls..
  6. Spoon the tomato and chilli sauce over the mussels and serve immediately, perhaps with fresh crusty bread and a green leaf salad.

Chilli mussels 1   Chilli mussels 2

Crayfish (lobster) thermidor

There is no shortage of recipes available for this dish; here is what Maggie did.

She made a simple bechamel sauce using 30g butter, 20ml plain flour and 1 cup of liquid (3 parts milk to 1 part dry white wine). She added a medium-sized fresh bay leaf just before the liquids were added to the butter and flour roux. When the sauce had thickened, the bay leaf came out and she added 2 tsp of Dijon mustard. Off the heat, she added a couple of handfuls of grated gruyere cheese and the chopped green sections of three spring (green) onions.

The finished sauce was spooned over the crayfish flesh in the shells, stabilised by scrunched-up sheets of cooking foil in the base of a baking dish. Then Maggie sprinkled some more gruyere cheese over the sauce.

To finish the dish, we placed it into an oven warmed to about 150C for about 10 minutes, until the cheese had just begun to melt. Then we turned on the grill in the oven and placed the baking dish to the second highest shelf until the cheese had begun to turn golden brown, taking care not to overheat the crayfish, because it was cooked before we bought it.

Thermidor 1   Thermidor 2


Posted in Cooking | Tagged , , , , , , , | Leave a comment

Our seasonal seafood saga

In the lead-up to Christmas, my father requested a meal of crayfish, and my son, Julian and his wife, Sara simply said they would like a variety of seafood. That suited Maggie and me just fine – we like many types of seafood.

For practical reasons, we served a festive lunch to my father two days before Christmas Day. We began simply, sharing a dozen oysters grown in Coffin Bay, South Australia. They had been shucked that morning and the quality was outstanding. Then came the crayfish, plated beautifully by Maggie in all its red-and-white glory.

Crayfish

The crayfish was accompanied by a freshly-made cocktail sauce, a creamy potato-and-herb salad, and a lightly dressed salad of baby spinach leaves and thick slices of our home-grown small tomatoes. For wine, we shared a bottle of Jim Barry’s ever-reliable Watervale (Clare Valley) Riesling. And, for dessert, we enjoyed some of this season’s remarkable raspberry crop with a spoonful of ice cream.

Later that afternoon, we strolled up the street to the home of our friends Janet & Gary, to share some nibbles and a glass or three of wine. We contributed a dip, made from Goulburn River smoked trout, herbs and a creamy dressing, with fresh carrot & celery crudites. This dip is very tasty but also quite rich, so there was plenty left to snack on over the next few days.

Trout dip

Next morning, it was time to do the final shopping and some of the preparation for the Christmas Day meal we would share with Julian, Sara and Iris. We bought another dozen oysters, a tail-end fillet of sashimi-grade Atlantic salmon and a bag of local mussels.

On Christmas morning, the family trio arrived by 10am. Presents were opened, including a plastic set of gardening equipment for Iris – wheelbarrow, watering can, forks and spades and a lawnmower with a starter cord that would generate a whirring sound when pulled. They are very active in their home garden, so Iris was one happy grand-daughter.

Once Iris had watered some of our pots with her watering can, it was time to start grazing. We had sweets and salad fruits, freshly-roasted chicken and ham for Iris; the rest of us began with the oysters. This dozen was from Tasmania and less fresh by a day, so they didn’t wow us like the ones from Coffin Bay.

No matter. The next small plate packed plenty of wow – salmon carpaccio with a tomato, herb and lime salsa. We have made this many times before but this was our best-ever rendition; Julian and Sara both had second serves.

Salmon carpac 4

Next came a plater of chilli mussels, which we had prepared the previous evening. Gently heated to little more than room temperature, they were full of flavour. And, like the salmon plates, full of Christmas colours.

Chilli mussels 4

We then put out some pieces of the chicken, slices of ham, a dressed salad of baby spinach leaves and toasted walnut, and some baby beetroot that I had boiled, peeled and dressed. Soon after we had rounded out our lunch with some fresh berries, it was time for Iris to go home; she had worn herself out gardening and paddling in the little pool we have for her in our yard. We had all enjoyed ourselves thoroughly.

But wait, there’s more! Once we had cleared up and put the dishwasher to work, Maggie suggested we retire to our couch with a glass of the Pewsey Vale riesling we had brought back from the Barossa Valley in June. While I made myself comfortable, she disappeared into our spare bedroom and returned with two wrapped parcels for me to open. This was quite a surprise, as we long ago stopped buying Christmas presents for each other; our seasonal food budget is part of the reason for this!

Inside the wrapping paper, I discovered two wonderful cook books: the updated edition of The Cook’s Companion, by Stephanie Alexander; and Mastering the Art of French Cooking, the famous book co-authored by Julia Childs and two French friends of hers. The former book is our first point of reference for what we do in our kitchen. The latter pushes many of my buttons: French food; the book and subsequent movie, Julie and Julia; Meryl Streep, my favourite actress, playing the part of Julia; our love affair with Paris …

Cookbooks

This special day was not done yet. Maggie had quietly secreted a second crayfish in the house and proposed that she prepare it in the manner of ‘lobster thermidor’. I’m not actually a big fan of crayfish. I don’t dislike it but I don’t appreciate the way that Maggie, my father and many others do, so its luxury-goods price tag is a mystery to my palate. However, the dish that Maggie served up was quite delicious and one I would happily eat again … when we next win the lottery!

Thermidor 2

Unsurprisingly, our menu was a little simpler on the following day. But we did treat our palates to some tooth-picked snacks of pieces of fresh buffalo mozzarella sandwiched between homegrown basil leaves and cherry tomatoes.

Basil tomato mozzarella

Recipes for these dishes will appear in a subsequent post. All of the fresh seafood was purchased from Eat Fish.

Posted in Cooking | Tagged , , , , , , | Leave a comment

Why did the tomato turn red?

Because it saw the salad dressing. Hah, hah, hah!

That’s exactly the kind of corny, pun-based joke that Maggie’s late father, Noel used to crack and, much to my son’s embarrassment, I let slip quite often myself.

But, enough frivolity. The actual purpose of this post is to describe the various dressings that Maggie and I make to add texture, moisture and a modest amount of flavour to salads. (The contents of this post will be of limited value for many home cooks but, for the rest of you, especially anyone who believes, as I once did, that they have little or no talent for making a salad, …)

There are no commercial salad dressings in our kitchen. We used to buy a manufactured dressing to use with a Caesar style of salad but, for the past few years, we have done away with that. And we have never, ever owned a bottle of what might be called ‘French’ dressing – I brought my habit of making my own vinaigrette into our shared kitchen.

I have previously posted our long-standing recipe for a vinaigrette dressing, which was a modified version of one I had found in a book of barbecue food recipes about 15 years ago. More recently, we have switched to the method that most trained cooks would use: whisking the ingredients together in a bowl, while using a simplified list of ingredients – white pepper, salt, sugar, mustard, oil and red wine vinegar – and trusting our experience and palates to get the balance of flavours and textures right.

The other style of dressing that we make regularly is a creamy one, such as you might use to dress a potato salad. In this case, we use three main ingredients – mayonnaise (Norganic Golden Soya), light sour cream and Dijon mustard – and we vary the proportions according to the type of salad.

For a potato salad, including fresh peas and plenty of chopped parsley and chives, we use 6 parts mayonnaise to 4 parts sour cream and 1 part mustard to produce about 110ml of dressing to go with 500g of potato.

For a coleslaw – shredded Savoy cabbage, finely chopped celery, grated carrot and beetroot, and some currants – we reduce the amount of mustard by half.

Then, for a Waldorf salad or baby beetroot, we bring the sour cream to the fore: 12 parts to 8 of mayonnaise and, barely detectable but noticed if absent, 1 of mustard.

And, finally, for a Caesar style of salad, we drop the mustard altogether and go about 50:50 with the cream and mayonnaise, with an extra pinch or two of salt flakes and black pepper to work with all that egg and lettuce.

Of course, we all have different palates and preferences. My point is, though, that your enjoyment of a salad can be enhanced by a well-proportioned, homemade dressing. You might even receive so many complements that you blush, just like that tomato!

Posted in Cooking | Tagged , , | Leave a comment

In-digest: week ending 13 December 2015

In common with my late mother, I particularly enjoy the festive season for the opportunity it brings to prepare special items of delicious food, and share them with friends and family. This year, I will have the bonus of spending Christmas Day with my son, Julian, for the first time since 2003. Naturally, Sara and Iris will be with us, as well as the grand-dog, Stevie Nicks.

Our menu for Christmas Day will comprise a series of small seafood plates, using smoked trout, fresh oysters, salmon, calamari and mussels; there might even be a bite or two of crayfish, leftover from lunch with my father, two days earlier. And there will be plenty of fresh fruit.

So, no turkey. Maggie and I used to cook a stuffed, rolled breast of turkey and we may well do so again. However, we now have a preference for roast poultry in the form of spatchcock, as was the case on Christmas Day last year. And we have recently discovered the full-size chicken that will be our preferred special occasion bird for the foreseeable future – the heritage chicken bred by the Sommerlad family in New South Wales and reared by selected farmers in NSW, Victoria, Queensland and Western Australia.

We had read about these in The Age newspaper a couple of months ago but, when we contacted the nearest distributor, none were available, as the producers were shifting to a new property. So, we had to wait until a couple of Sundays ago, when we collected our first chicken produced by Mirboo Pastured Poultry and retailed by Carlton meat purveyor, Skinner and Hackett.

On the following Tuesday, our friendly neighbours, Janet & Gary, came down to share this special chicken dinner. We all agreed that it was the tastiest chicken we had ever eaten. The cooking method was quite involved and I will need to do it again – yes please, says Janet – before I will be able to codify it. On this first occasion, we served it simply – roasted chunks of potato and whole peeled cloves of garlic, a lightly-dressed salad of fresh mint-infused peas and shredded lettuce, and the slices of dry-cured Pacdon Park bacon we had used to protect the chicken breasts in the latter stages of the roasting.

Chicken Mirboo

In Melbourne, we are having a dry and very warm start to Summer, on the back of a very dry Spring. So, it is challenging for active home gardeners like Maggie and me. One plant that does thrive in these conditions is basil, provided you feed and water it regularly. We always grow basil in a pot, so we can move it in the event that a cold night is forecast.

We use basil in various ways: added to a tomato-based sauce or salsa – think bruschetta, chilli mussels, pizza margherita; in a salad with chunks of tomato, balsamic vinegar and olive oil; as a canape with cherry tomato halves and buffalo mozzarella on a toothpick; and to make pesto genovese or basil pesto, something I have been doing for at least 25 years.

Ingredients

80g pine nuts
6 cloves fresh garlic (vary according to strength, size and your own preferences)
125-150ml olive oil (use the lesser amount if you intend to use the pesto as a flavouring rather than as a pasta ‘sauce’ on its own)
35g fresh basil leaves
120g grated parmesan or pecorino (quality is important here)

Method

  1. Grind pine nuts in bowl of food processor.
  2. Add garlic cloves and 50ml of oil and blend.
  3. Add basil leaves and 50ml of oil and blend finely (I usually interrupt once or twice to scrape down sides of bowl).
  4. Add cheese and rest of oil and blend thoroughly.
  5. Used within an hour of preparation, pesto is wonderfully flavoursome. Place 2-3 teaspoons of pesto on the bottom of a pasta bowl and spoon over freshly cooked pasta, then add extra cheese, salt, pepper or olive oil to taste.
  6. Spoon leftover pesto into clean glass jars and store in your freezer for up to 6 months. (I believe this is a safer storage method than in your refrigeration space, even if topped with a layer of olive oil, as garlic can deteriorate dangerously over time.)

Pine nuts are expensive but this recipe only uses $5 worth. I always buy pine nuts from a store with high turnover – hence fresher and cheaper – and keep them in our fridge to prevent them becoming rancid before we have time to use them all.

In most places where basil thrives, there should still be a supply of locally-grown garlic available, at least early in Summer.

Another food that I associate with this time of the year is smoked salmon. We often use it in tandem with fresh asparagus, as a light lunch or canape. Or in a caesar style of salad instead of bacon. And, once or twice at either edge of Summer, in a quiche, accompanied by a tomato-rich salad. As we did late last week.

The pastry and much of the filling was the same as for our version of quiche lorraine. For onion, we used a few spring (green) onions – the white ends sliced and sauteed in a little butter, the green ends sliced and raw. We used about 150g of the salmon, packaged at a good price as trimmings by Tassal. And about 20g of parmesan and 60g of grated cheddar cheese.

Cooked outdoors on a warm day in our Weber Q. Tasty, light and enough to feed five or six senior adults for lunch.

Quiche salmon   Quiche salmon 3

The last item of this week’s cooking news is a light lunch of fresh sardines, something we had not cooked before. They’ve been on my mind for a while, possibly owing to the fresh fish meals we enjoyed on Croatia’s Adriatic coast. So, we bought a dozen whole, scaled sardines late last week and only then did we consider what we might do with them.

In the end, we decided against char-grilling, lacking the know-how and confidence. Instead, Maggie used her knife skills to remove heads, guts and backbones. Then we floured, egged and panko-crumbed them for quick – two minutes per side – pan-frying in olive oil. Crumbs can overwhelm some small pieces of fish – whiting comes to mind – but sardines have the flavoursome oils to work with this method. They were lovely and fresh and we will do this again soon.

Sardines 1   Sardines 2

Finally, images of two happy events in our garden: hundreds and hundreds of flowers on our three gardenia plants – responding profusely to two consecutive years of fatherly love; and the first of this year’s crop of small tomatoes, grown in pots.

Gardenias   201516 toms

Posted in Cooking, Home life | Tagged , , , , , , | Leave a comment

In-digest: week ending 6 December 2015

It’s been a few months since I last wrote a post about noteworthy dishes that Maggie and I had cooked in the preceding week. Not that there hasn’t been a whole mess of cooking going on! It’s just that I have been fully occupied with the before, during and afterwards of our travels in Britain, Croatia and Singapore. And I have also been busy over the last couple of weeks, creating a blog that will carry my father’s memoirs.

With that latter task now well advanced, let me share some images and recipes for a few items from last week’s menu in our home.

Gingerbread

Gingerbread

This straightforward recipe produces a biscuit that has good crunch and plenty of spice. With only 10 minutes of baking time, the oven temperature is critical; we set our oven at 170°C, because it tends to cook higher than indicated on the dial. Also, you may find that the gingerbread tastes spicier the next day, when your olfactories have been distanced from the cooking aromas.

Ingredients

125g butter, softened
100g (dark) brown sugar
125ml golden syrup
1 egg yolk
375g (2½ cups) plain flour
1 tbsp ground ginger
1 tsp mixed spice
1 tsp bicarbonate of soda
plain flour, for dusting

Method

  1. Preheat oven to 180°C (lower by 5-10°C if you are making small biscuits). Line two baking trays with baking paper.
  2. Use an electric beater to beat the butter and sugar in a bowl until pale and creamy (4-5 minutes).
  3. Add the golden syrup and egg yolk and beat until combined.
  4. Combine the flour, ginger, mixed spice and bicarbonate of soda, tip into the bowl and stir to combine as best you can.
  5. Turn onto a lightly floured surface and knead until smooth.
  6. Press dough into a disc. Cover with plastic wrap and place in the fridge for 30 minutes to rest.
  7. Place the dough between 2 sheets of baking paper and roll out until about 3mm to 4mm thick.
  8. Use cutter to cut out shapes. Place pieces about 1cm apart on the trays. Repeat with any excess dough.
  9. Bake in oven for 9-10 minutes. Remove from oven and transfer to a rack to cool.
  10. Store in an airtight container; if not, your gingerbread will slowly but surely go soft.

Pasta with mushroom & asparagus (& ham) ragu

Asparagus mushroom

We are half way through the asparagus season in southern Australia, and Maggie and I are eating 8-10 spears between us each week, prepared in a variety of styles. This dish is relatively simple and light, and can be made and served in about 30 minutes. So, it works well for lunchtime.

For every 100g of roughly sliced (Swiss brown) mushroom, I use: 2-3 asparagus spears, each cut into 5-6 segments; 1 tbsp olive oil; 10g butter; 2 spring onions, finely sliced; 1 clove garlic, ditto; 1 bay leaf or leaves from 3-4 thyme sprigs; a generous seasoning of salt and pepper; 1/4 cup dry white wine; and 10-15 ml of cooking cream.

  1. To pre-cook the asparagus, add the segments  to a saucepan of boiling water, to which you have added a pinch of bicarbonate of soda and a few pinches of salt.  (There should be just enough water to cover the asparagus.) Put the lid on the saucepan and keep the heat high.
  2. After one minute, the water should be boiling again.  Remove the lid, reduce the heat slightly – the water must continue to boil – and set the timer for 3 minutes (30 seconds less for thin spears). Drain the asparagus into a colander immediately. (If the asparagus was to be served cold, I would NOT rinse the pieces with cold water! Rather, place them on some paper towel in a dish and refrigerate them immediately.)
  3. Saute the onion and garlic in 2 tsp oil and the butter for 3 minutes, then add the mushrooms and herbs. (Cook’s tip: put a lid on the mushrooms for 2-3 minutes and sweat them; then you won’t feel like you need to add more oil/butter.)
  4. About 6 minutes after you put the mushrooms in, add the wine, seasoning and rest of the olive oil, then simmer for about 10 minutes with a lid on the pan but slightly ajar; add a little water if it is drying out.
  5. While your pasta of choice is cooking, add the cooked asparagus and cream and simmer gently for 2-3 minutes to thicken the sauce. Adjust seasoning to suit and spoon over the drained pasta in a bowl. Sprinkle with parmesan or pecorino, as you prefer, or not at all.

During the festive season, sometimes vary the ragu by adding about half a cup of diced leg ham and a teaspoon of Dijon mustard.

A couple of old faves

Our ninth wedding anniversary took place last week, on a day when the maximum temperature in late-Spring-time Melbourne was 17°C, minus a hefty wind-chill factor. So, we celebrated by making our favourite chicken casserole which, coincidentally, was the first new dish we cooked after we started living together in 2004. Aw shucks!

We also made a batch of meringues for the first time this strawberry season. Normally we would have been into our third or fourth batch by now but, for, ahem, dietary reasons, we have sworn off hollandaise sauce during this year’s asparagus season. So, it was only by a combination of good luck and good management, that two surplus egg whites became available this week. (One was provided by the gingerbread recipe, another by a batch of our crumbed chicken wings.)

Hamburgers

I’ve been making hamburgers for more than four decades, but most of the better ones have been since the year my friend Bill specified celery as a required ingredient for any burger patties he would willingly consume.

My latest recipe, road-tested just last week, keeps things simple, includes pork, to sweeten the flavour of the meat, and white pepper, for its superior piquancy.

Ingredients

50g celery, finely diced
50g carrot, grated
150g each of minced beef and minced pork
1 tsp Dijon mustard
¼-½ tsp salt
¼ tsp white pepper
1 egg yolk (enough to help bind the mixture without giving it an ‘eggy’ flavour)
NO breadcrumbs – your chosen burger bun will provide all the bread flavour you need!

Method

  1. Saute the celery in a little olive oil for about 4 minutes, add the grated carrot, saute for a further four minutes and remove from the heat.
  2. When the vegetables have cooled a little, add them to the minced meats in a bowl, and work the mixture vigorously with your hands or the back of a spoon. This will break down connective tissues in the meat and thereby help the patties stay intact when you cook them.
  3. Add the mustard, the seasonings and the egg yolk, and combine well.
  4. Form into two patties, about 1cm thick, place them on a plate and refrigerate for 30 minutes.
  5. We cook the patties on the grill plate of our Weber Q – 5 minutes on one side, 4 on the other.

Pork belly

Maggie and I first cooked pork belly early in our marriage, using two different recipes by Melbourne chefs. The two methods had one thing in common – braising the meat first, then roasting it the following day.

In time, we tired of this technique and switched to a marinade-then-roast recipe by another renowned Australian chef, Neil Perry. I wrote about this recipe only a few months ago.

Alas, I came down with a dose of palate fatigue and sought rejuvenation through a new pork belly recipe. I found one – of the twice-cooked variety – we modified it and put it to the test. Twice in the last fortnight. We are very happy with the end result. Here is the recipe for cooking 600g-700g of boneless pork belly.

Ingredients

1 cup (250ml) chicken stock
160ml water
1-2 cloves garlic, finely sliced
1 stick celery, roughly chopped
40ml soy sauce
1 whole red chilli
2-3cm piece fresh ginger, thinly sliced
2 strips fresh orange peel
1 star anise
1 small piece cassia bark or 1/2 a cinnamon stick
600g-700g of boneless pork belly

Method

  1. Place all the ingredients, except the pork, in a lidded saucepan or heat-proof dish just large enough to hold the pork belly snugly.
  2. Bring to the boil, add the pork belly skin-side up and simmer for 40 minutes. Turn the belly upside down and simmer for 25 minutes. Turn again and simmer for a further 25 minutes. Remove from the heat.
  3. Transfer the pork to a dish to cool, then cover dish with cling film and refrigerate for at least 6 hours (see step 4).
  4. Strain the cooking liquid, refrigerate until fat has solidified, remove fat, dilute about 50:50 with water and use to cook some basmati rice to accompany the pork and your preferred vegetables.
  5. Remove pork from fridge at east one hour before cooking and score the skin to your own liking – Maggie does lines about 1cm apart or a criss-cross-diagonal pattern
  6. Roast in an outdoor or indoor oven, preheated to 180C-190C, for about 40 minutes or the skin has crackled to your liking. By now, the majority of the fat will have been rendered.
  7. Rest for 10-15 minutes, then slice thinly with a sharp knife to serve.

Pork Belly B 1   Pork belly B 2

Pork belly B 3

Posted in Cooking | Tagged , , , , , , , , | Leave a comment