Cream of white asparagus soup

This is another recipe inspired by our travels in Europe earlier this year. It was the middle of Spring and the asparagus season was in full swing. Restaurants were promoting special asparagus menus – everything from entrees to desserts – and there were beautiful displays of fresh spears in local shops and street markets.

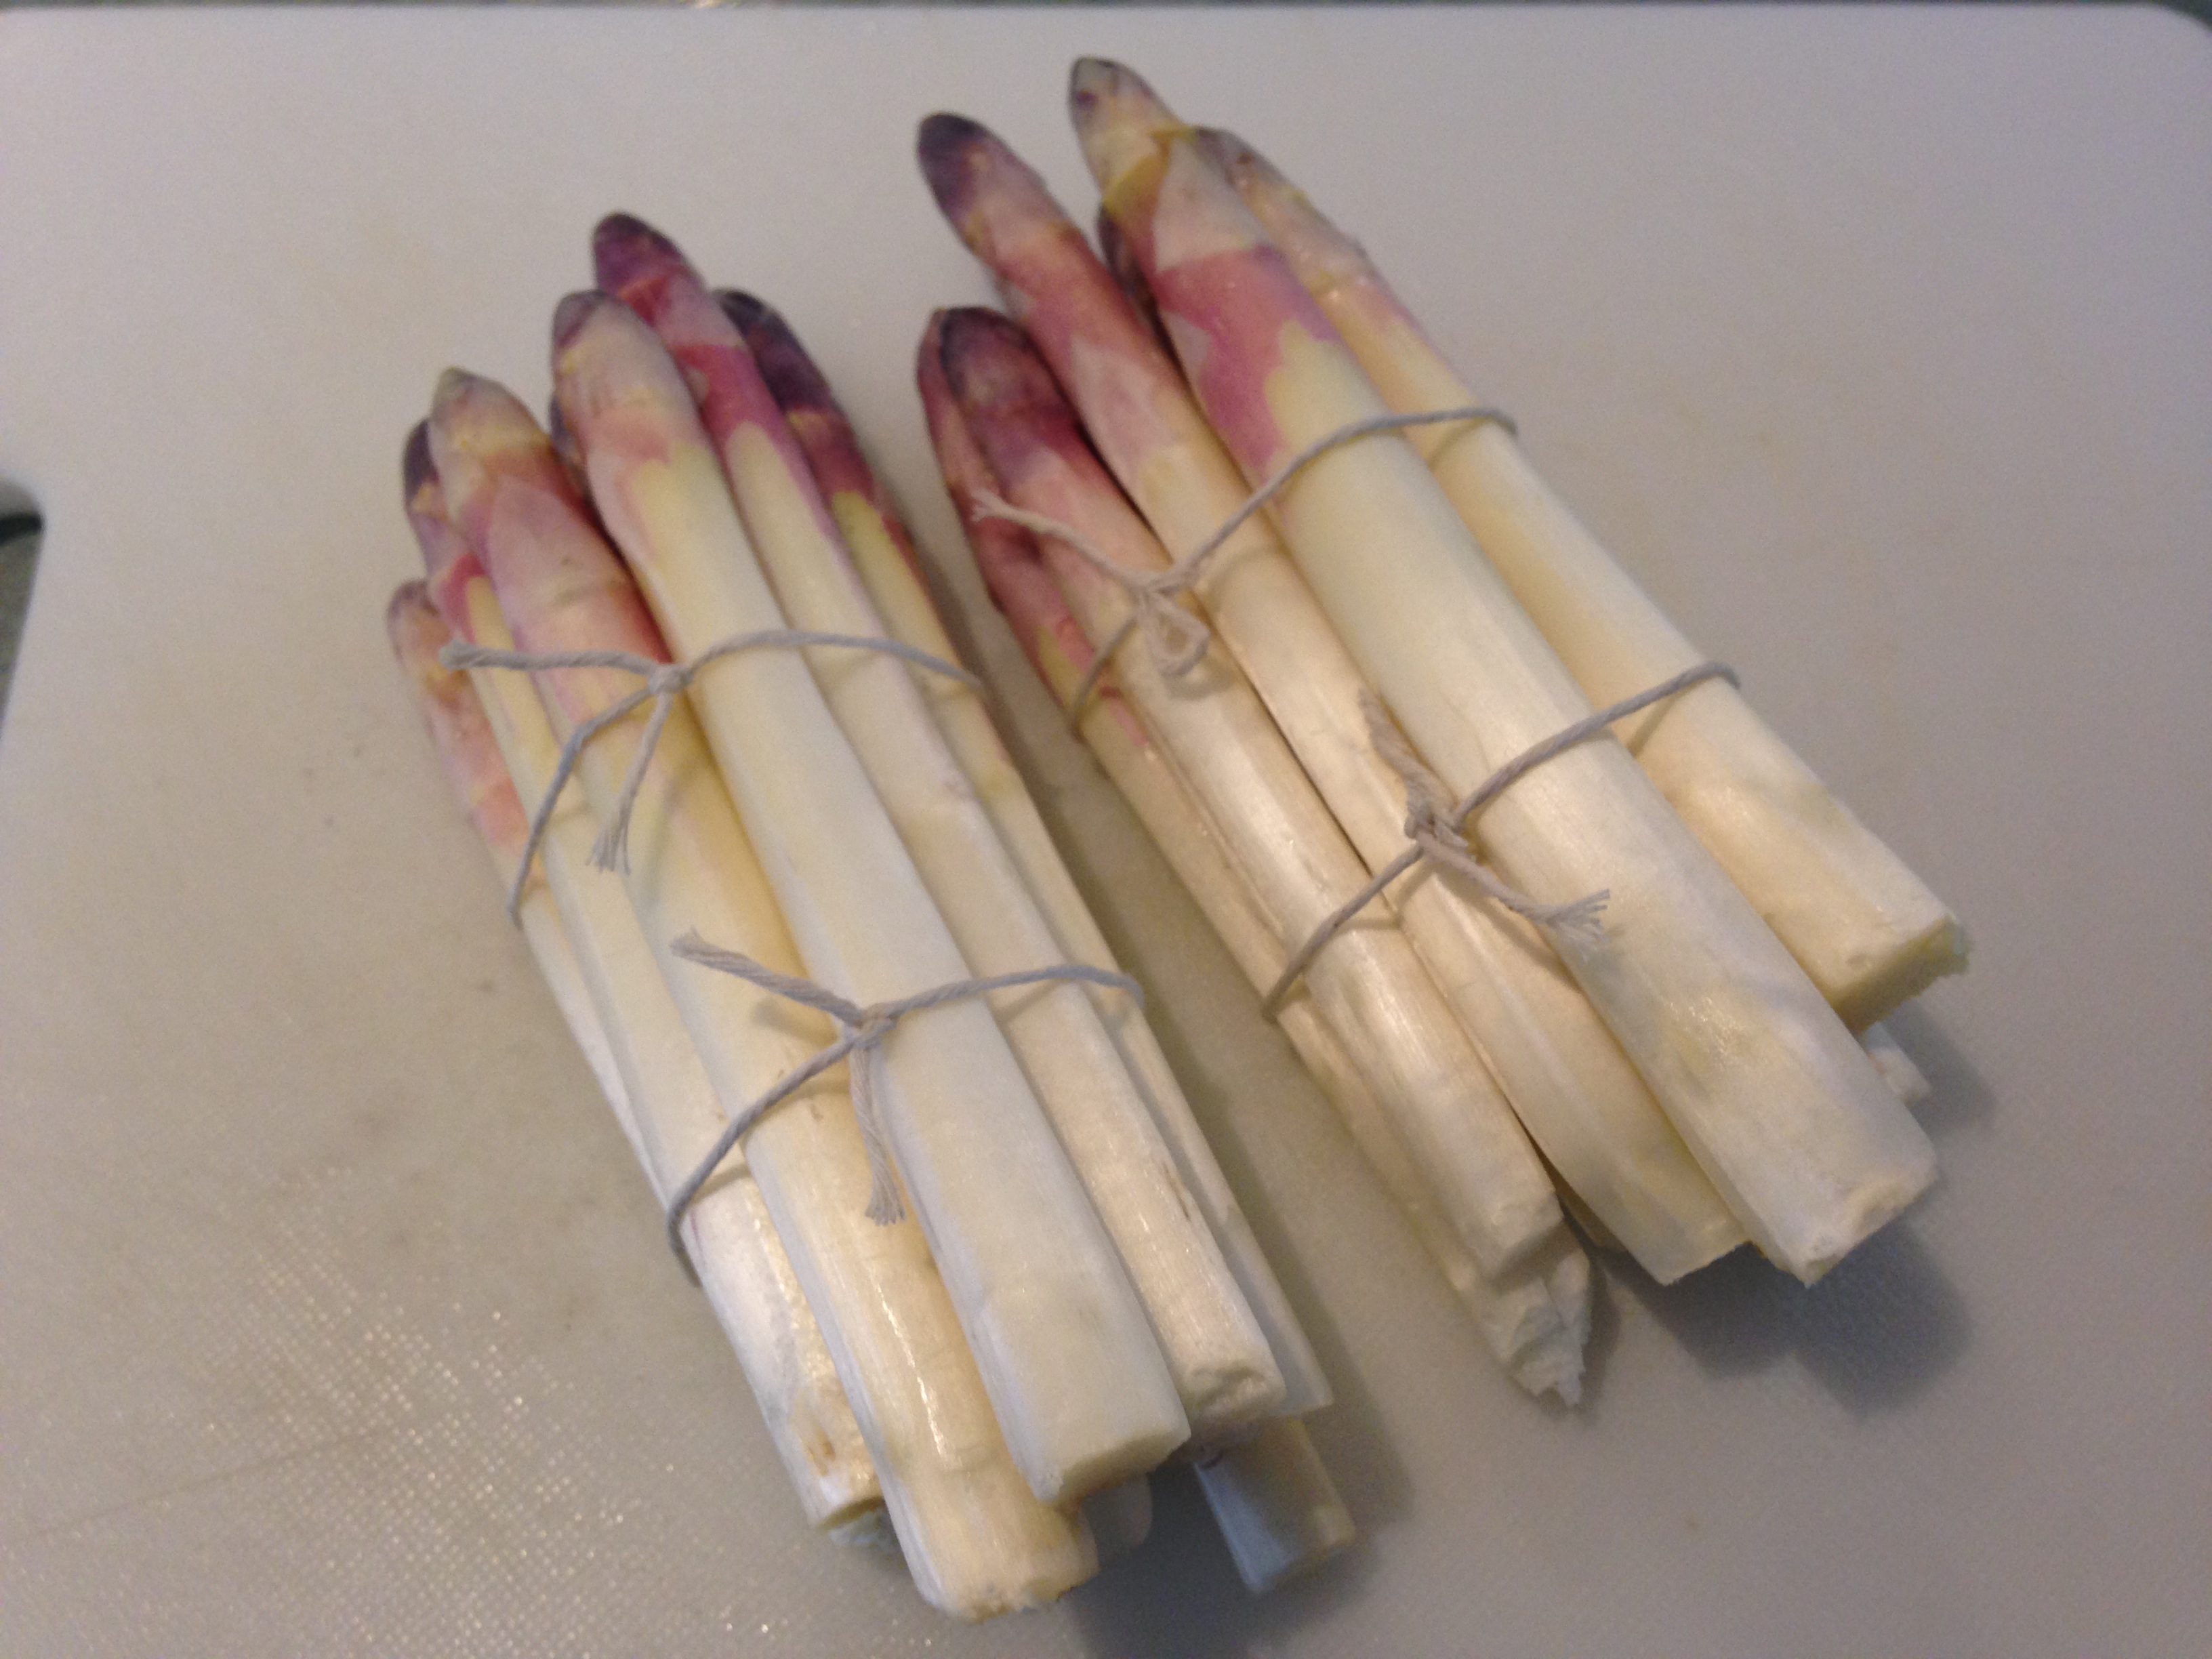
It was the plump white spears that particularly caught our attention. White asparagus is not widely available in Australia and, when it is, it costs more than green asparagus; the latter does not apply in Europe.

We ate several asparagus dishes during our four weeks in France and central Europe, including a remarkable white asparagus soup when we dined at Chez Pramil in Paris (see earlier post of April 2014).  After our return, we resolved to attempt to produce something similar during our local asparagus season.

Last Saturday, we went to the Farmers’ Market held at the wonderful Collingwood Children’s Farm on the second Saturday of each month. It took us just 45 minutes to fill our double-decker shopping cart with a bounty of fresh produce, including two bunches of white asparagus.

On Sunday, we turned the asparagus into an elegant soup, known as spargelsuppe in southern Germany, the epicentre of Europe’s asparagus industry. Here is how we did it.

Ingredients

320g white asparagus spears
500ml chicken stock
1 tbsp (20ml) sugar
salt, to taste
110g butter
30ml lemon juice
white pepper, to taste
¼ cup plain flour
½ cup cooking cream
fresh chives, chopped gently

Method

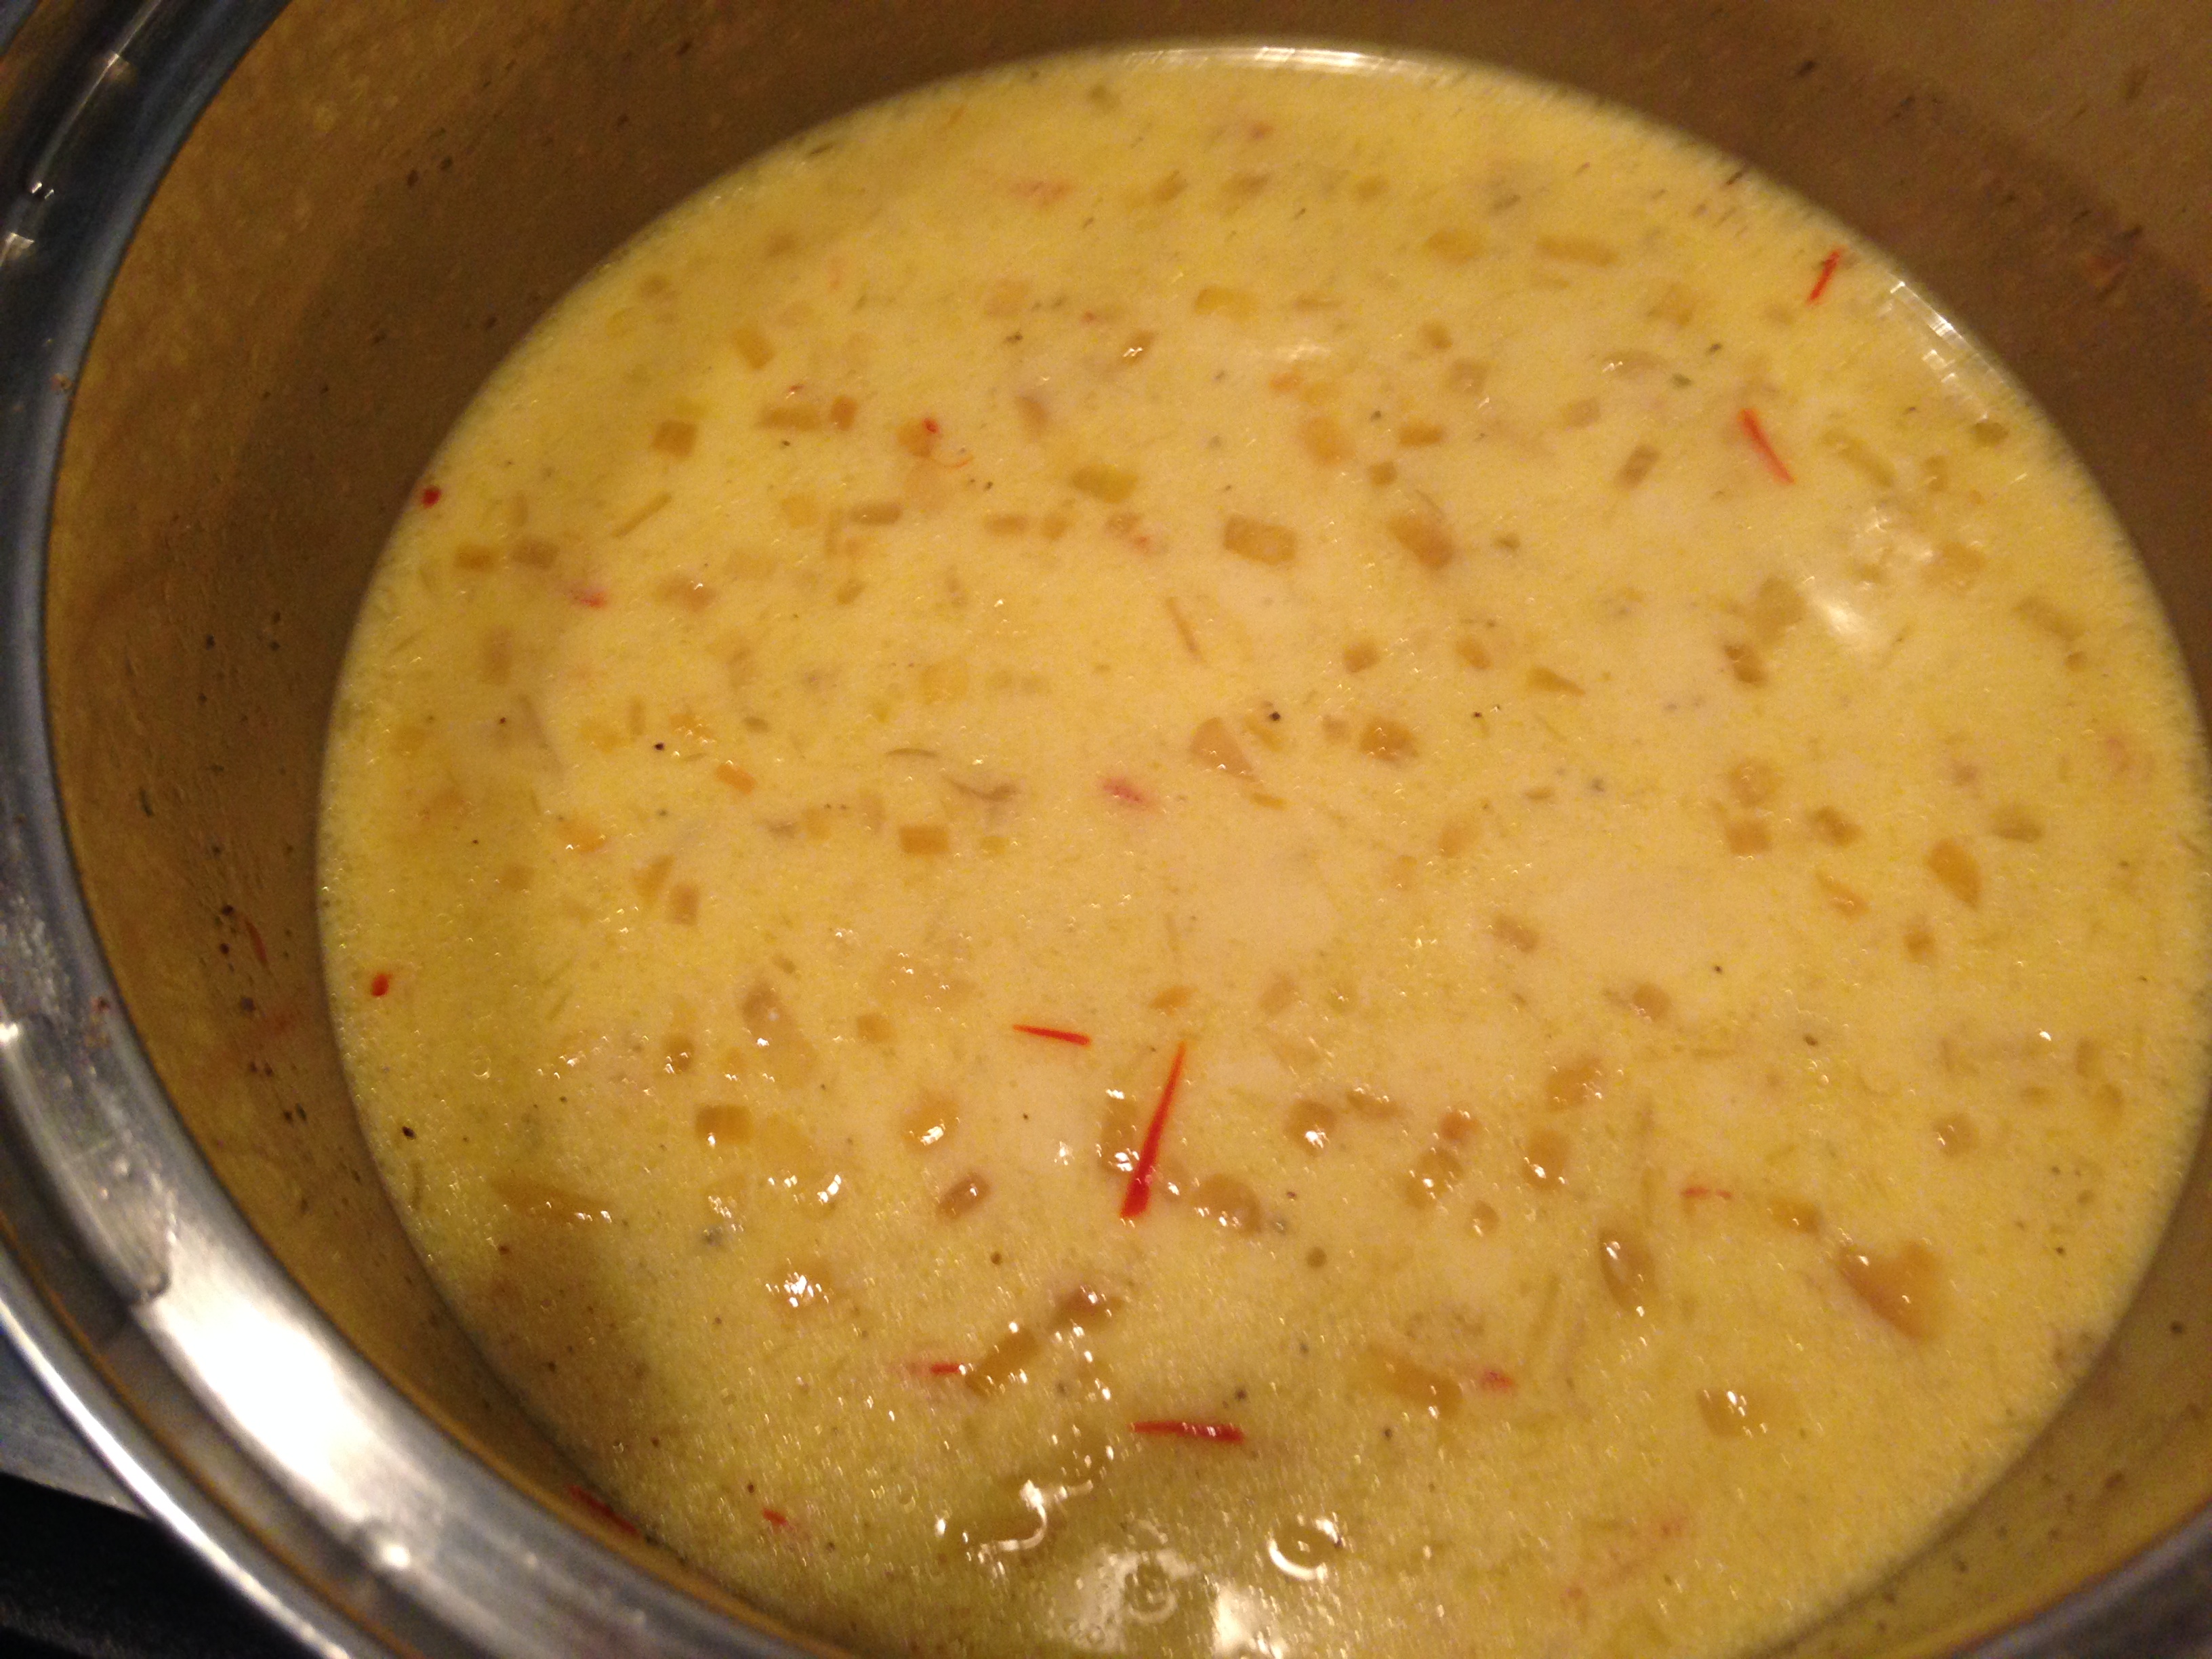
  1. Trim about 1 cm from the base of each asparagus and reserve the trimmings. Prepare each spear by laying it on a workbench and using a sharp swivel-blade vegetable peeler to remove the skin, starting just below the top section of each spear; reserve the peeled skin. Use kitchen string to tie the spears securely into two bundles.
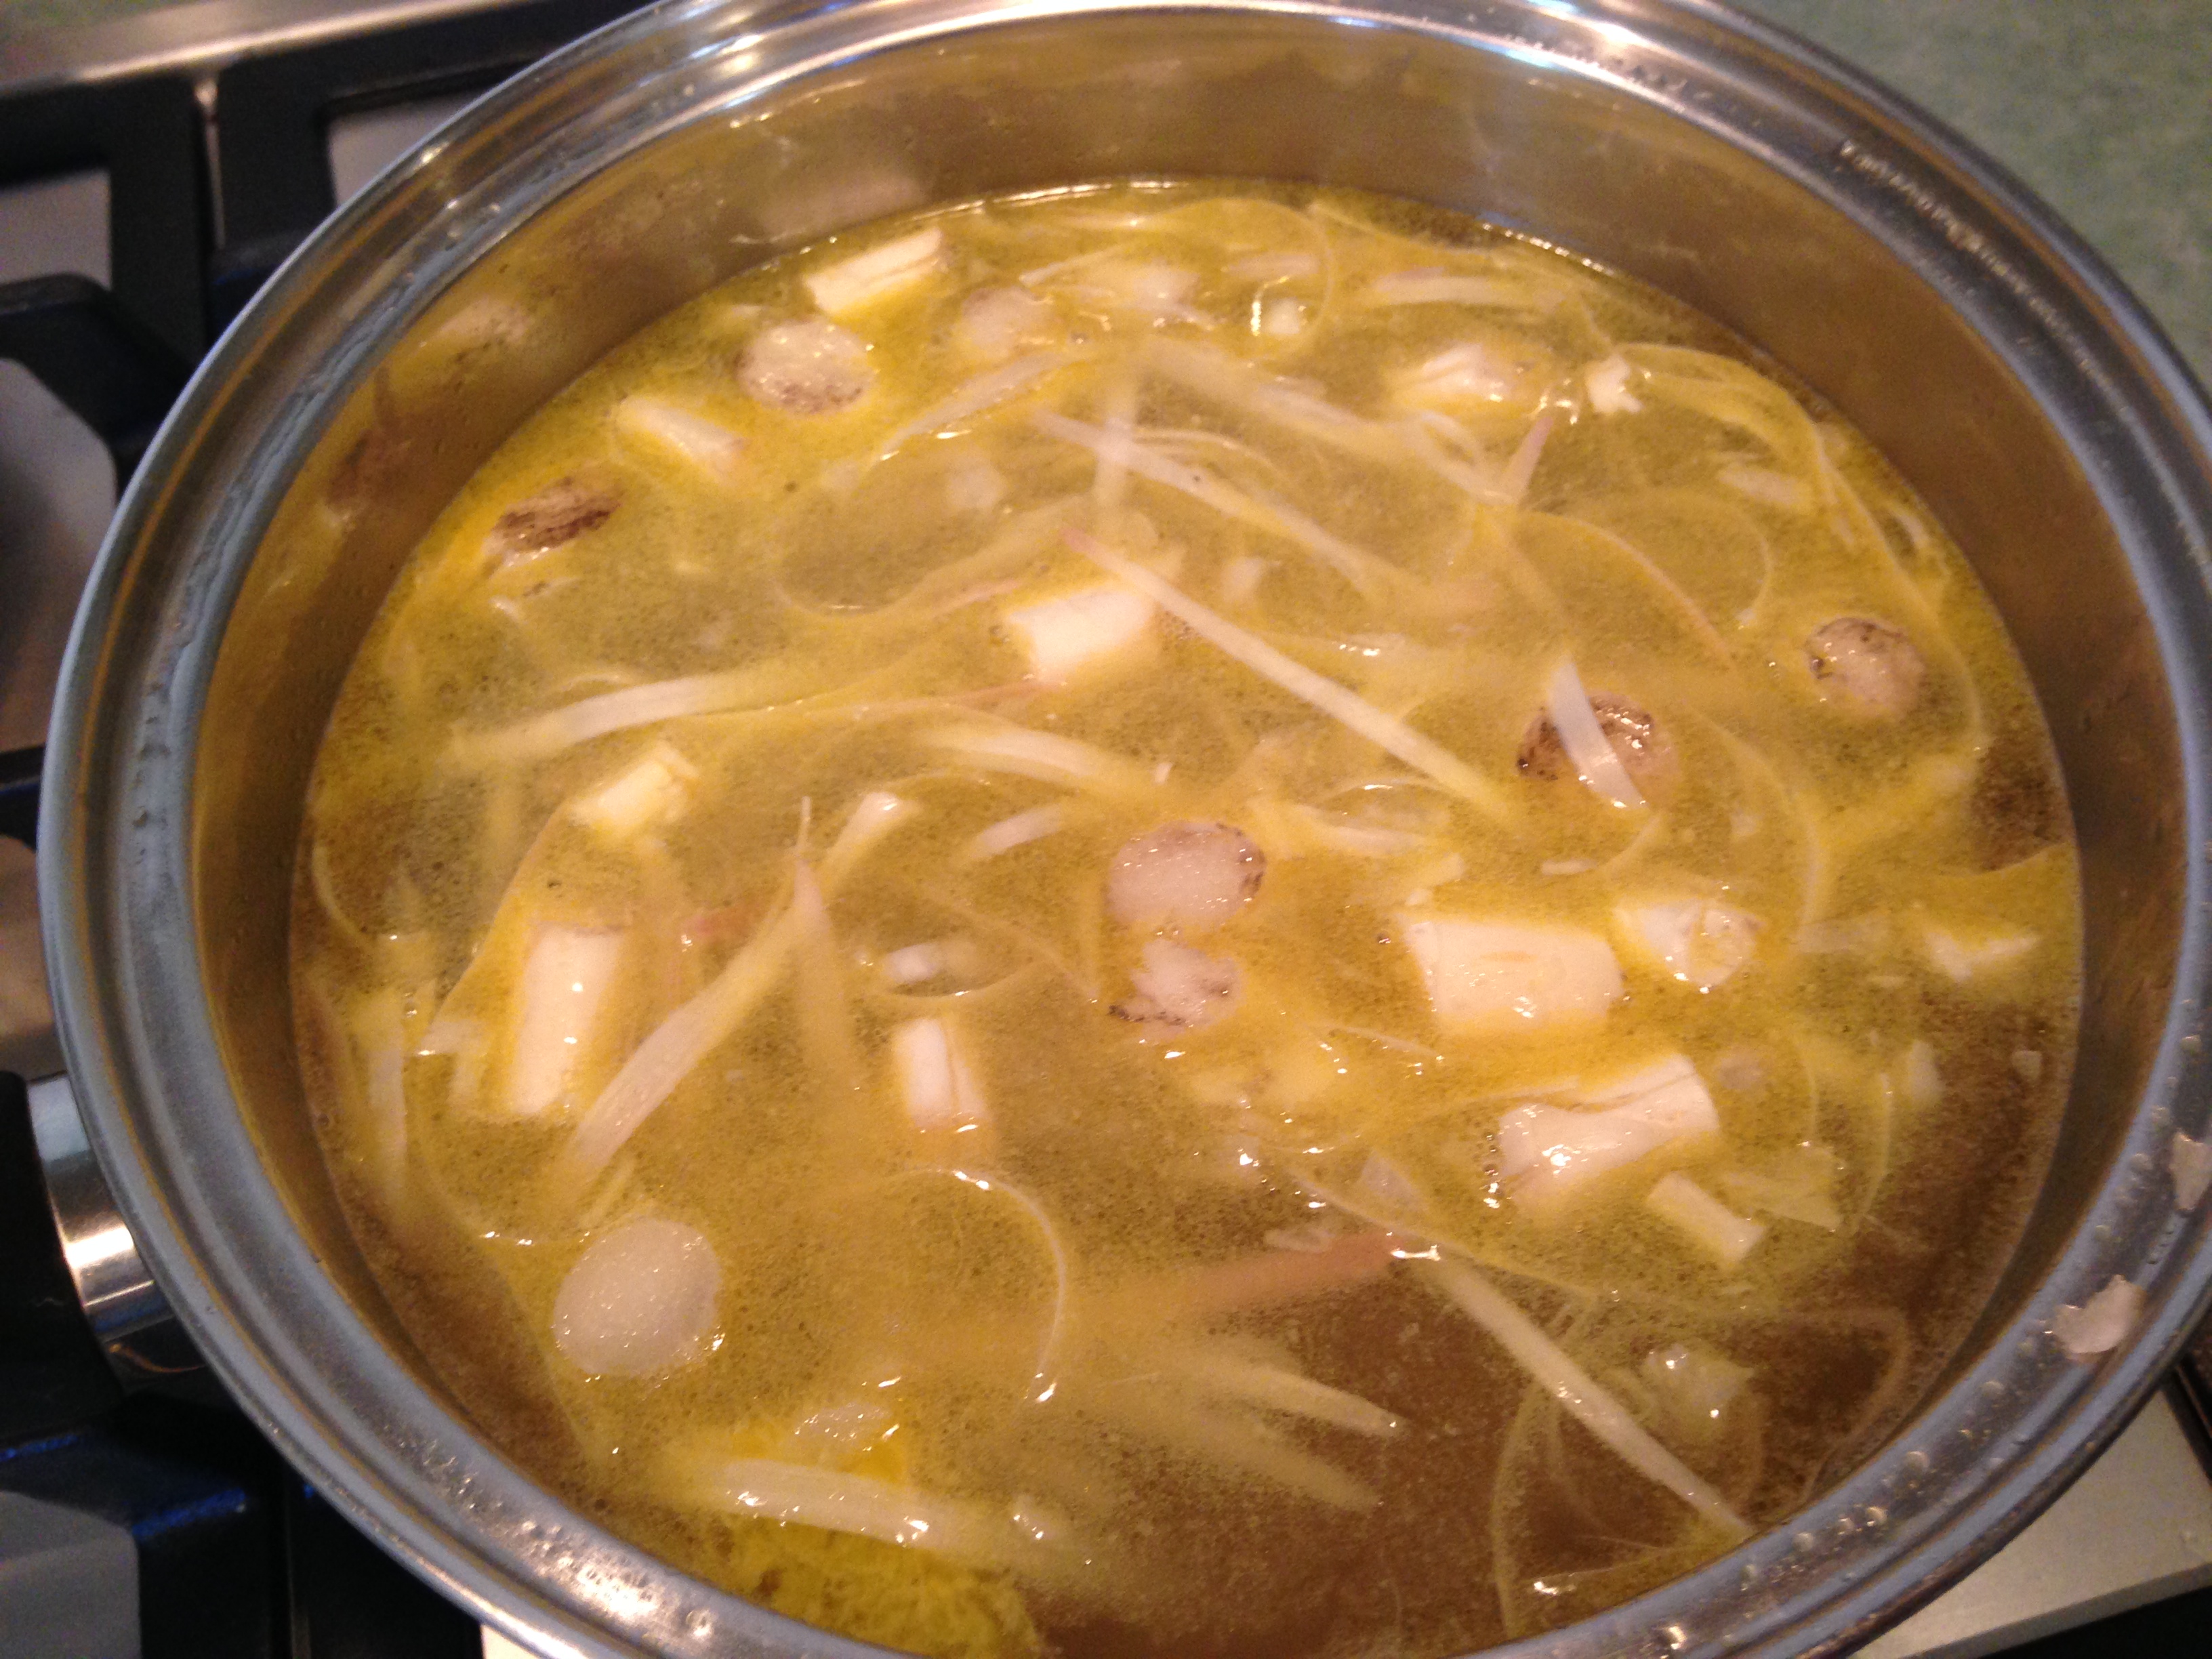
  2. Add 1½ litres (6 cups) of water and the chicken stock to a large saucepan and bring it to the boil. While the liquid is heating, add the sugar, two generous pinches of salt, 30g butter, lemon juice and all the asparagus trimmings to the pan.
  3. Once the liquid is boiling, add the asparagus bundles to the pan, bring it back to a simmer and cook for 15 minutes. Test the spears for tenderness using the point of a sharp knife. By this time, thin spears should feel evenly firm right through; thicker spears will take up to 10 minutes longer. Remove asparagus, remove string and place the spears on a plate to cool.
  4. Strain the cooking stock, discard solids, return the stock to the pan and bring to a rapid boil. Reduce the volume by one-third; this will take at least 20 minutes. Check seasoning after 15 minutes, adding white pepper – about ¼ teaspoon – and probably another pinch or two of salt.
  5. Roughly chop the asparagus and place it in a blender (or a pan and use a stick blender). Add 1 cup of the reduced stock and blend until smooth.
  6. Check the flavour of the stock. There should be a distinct but subtle flavour of asparagus, along with hints of lemon and sweetness and balanced seasoning. If in doubt, reduce the volume for a further 5 minutes. Transfer stock to a smaller pan.
  7. Add the remaining 80g of butter to the original pan and melt it over low-to-medium heat. Add the flour and cook for just over a minute. Add the stock ½ a cup at a time, stirring constantly with a whisk to keep the soup smooth. Simmer for 10 minutes to thicken the soup.
  8. Add the blended asparagus, return to a simmer, add the cream and simmer for 2 minutes more.
  9. Serve in warm bowls and sprinkle a couple of pinches of chopped chives in the centre of each bowl.

Asparagus soup 1   Asparagus soup 2

Asparagus soup 3   Asparagus soup 4

Posted in Cooking, Travel | Tagged , , , , | Leave a comment

Poached pears

In a previous post, I wrote about a dessert of baked pears that we enjoy making. We also like a dish of poached pears, cooked in a wine syrup; we use red wine in the cooler months and white wine in summer, with some corresponding variations to the added flavours.

Use pear varieties that are suitable for poaching – Beurre bosc is commonly chosen in Australia – and  choose pears that are not at all soft, otherwise they will turn to mash. Use a fruity Cabernet-based wine in winter/spring and a fruity Chardonnay in summer; but don’t pay top dollar – a drink-now bottle will suffice.

Ingredients

4 ripe Beurre Bosc pears
1 cup raw sugar
1 cup water
2 cups wine
Juice of 1 lemon (½ only in summer) and 1 orange (you could peel some of the skin and add that too)
1-2 cinnamon sticks
4-6 cloves
3-4 cardamom pods
3 cm of fresh ginger cut into matchsticks (vary spices according to personal taste)
1 vanilla bean cut into thick matchsticks (summer only)

Method

  1. Place all ingredients except pears in a saucepan large enough to hold pears and liquid snugly, and bring to simmering point to create a thin syrup.
  2. Peel pears, halve and cut out hard end of core.
  3. Add pears to syrup and simmer VERY gently until tender (can take 25-40 minutes, depending on size and ripeness). Gently turn pears occasionally to ensure entire flesh is infused with syrup.
  4. Remove pears using a slotted spoon and boil syrup to reduce by about half and thicken. Allow syrup to cool then strain over the pears.
  5. Serve at ROOM temperature with cream, ice-cream (but it might be too sweet) or, as Maggie prefers, au naturel.
  6. The summer syrup ingredients can also be used to poach peaches or nectarines but they only take about 10 minutes to cook, so the syrup should be simmered for at least 20 minutes before adding the fruit. Score the skin along the natural groove before cooking and it will come off easily once it has cooled.

The batch I made yesterday turned out to be a bit tart, probably because I used too much juice from a lemon off our tree. Fortunately, acidic fruit is one of the main reasons why the sweet-tooth fairy invented French vanilla ice-cream!

Poached pears 1   Poached pears 2

Poached pears 3Poached pears 4


Posted in Cooking | Tagged , | 1 Comment

Cauliflower soufflé

By now, regular readers might have formed the impression that the core ingredients for almost all of our meals come from land-based animals. That is close to the truth. We do eat fish but usually cooked in a way that is simple, so not particularly blog-worthy; ditto for scallops and prawns.

As for vegetables, we have as many as 20 different types in the fridge or pantry at any given time but mostly they are used to make side dishes and salads or as ingredients in a soup or braise; in fact the majority of our favourite soups are made only from vegetables.

Before Maggie and I became partners in 2004, I had several vegetarian dishes on my repertoire – quiches, filo pies, omelettes, pizzas and, for over 30 years, the occasional soufflé, either carrot, spinach or cauliflower. Maggie, on the other hand, brought a long-standing aversion to most vegetables into our kitchen; no allergies, just didn’t like them, or wouldn’t.  Cauliflower was near the top of the anti-wish list.

Her attitude began to soften when we read a recipe that used black pudding (one of her favourite offal treats), seared scallops and a puree of the white stuff to create an attractive dish.  A day or so later, a small, pretty and fresh cauliflower caught her attention and she just had to bring it home. We tested the recipe, decided on modifications and slid the cauliflower component into our mashed potato recipe.

So, with cauliflower allowed in the house, I revived the soufflé and Maggie liked that too; it was even added to our collection of favourite recipes. I made it again yesterday and it turned out pretty well, visually and to the palate.

Cauli souffle 3

It can take a few tries to master the art of making a soufflé, including how it behaves in your own oven. However, it is worth persevering, as nothing quite matches a soufflé for its combination of texture and flavour. Fresh, in-season cauliflower goes really well in a soufflé, even adding a hint of natural sweetness.

Ingredients

300g cauliflower
basic béchamel sauce made using 1 cup of milk
100g cheddar cheese, grated
generous pinch of grated nutmeg
2 tsp Dijon mustard
4 eggs
salt
dry breadcrumbs

Method

  1. Prepare the béchamel sauce. When it has finished thickening, remove from the heat, add the cheese, nutmeg and mustard and stir to combine well.
  2. Divide the cauliflower into several smaller pieces and remove thicker parts of the stems. (You should end up with about 250g.) Steam the cauliflower for at least 15 minutes, until the stems are tender but not falling apart.
  3. Transfer the cauliflower to a large mixing bowl and, when it is no longer giving off steam, mash it to a coarse but even consistency. Add the béchamel sauce to the bowl and stir to combine.
  4. Preheat oven to 175C.
  5. Separate the eggs, placing the 4 whites in a separate clean mixing bowl. Add 3 of the yolks to the large mixing bowl. Stir well to combine. Adjust seasoning – you might need to add a pinch or two of salt or a couple of teaspoons of pecorino or parmesan.
  6. Grease two 1 litre soufflé basins with butter. Sprinkle some breadcrumbs into each basin and tilt the basins to spread the crumbs over the bases and sides.
  7. Whisk the egg whites until creamy and firm. Add about half to the main bowl and, using a large metal spoon, fold gently through the mixture. Add the remaining egg white and complete the folding.
  8. Divide the mixture between the two basins and run a finger around the rim of the top surface of the soufflé. The soufflé will rise within this flattened edge.
  9. Transfer to the oven and bake for about 25 minutes. If you have to open your oven to turn the basins to achieve even cooking – as we do – be quick but open and close the oven door gently. When cooked, the soufflé should be well risen and browned.

The first photo below shows the cauliflower before it was steamed; the second one shows the mixture of cauliflower, béchamel and egg yolks. (Maggie wasn’t around for the preparation period and I forgot to take other photos of the method.)

Cauli souffle 1   Cauli souffle 2

We served the soufflé with lightly-boiled fresh asparagus – in peak season right now – and a mixture of bacon and mushrooms.

Cauli souffle 4

Posted in Cooking | Tagged , , , | Leave a comment

Nice-inspired mussels: the method

  1. Soak the saffron threads in a little boiled water.
  2. To prepare mussels for cooking, soak raw mussels in cold water for 10 minutes, scrub and remove the beard.
  3. Meanwhile, sauté the shallot and garlic in olive oil for 10 minutes over low heat in a saucepan.
  4. Place thyme sprigs, bay leaf and peppercorns in the base of a pan large enough to accommodate the mussels in no more than 2 layers. (We also added some bits of spring onion and fennel that had to hand.) Add enough dry white wine to cover the bottom of the pan to a depth of 1cm.
  5. Seal with a tight-fitting lid (close any steam vents), turn heat to maximum and wait 5 minutes. Remove from heat, lift lid and remove all the mussels that have opened. Place the pan back on the heat for 2 minutes and discard any mussels that have not opened at this second attempt. Transfer the mussels to a large warm bowl, remove half of each shell and discard; keep the mussels just warm. Strain the cooking liquid into a bowl and discard the seasonings.
  6. Add brandy to the saucepan of shallot and garlic and cook off then add saffron threads and about 100ml of the reserved cooking liquid. Cook briefly, add more of the liquid to taste, say 60ml, adjust seasoning and simmer for 5 minutes. Add cream and parsley, bring back to simmer and remove from the heat. Add a couple of sprinkles of cayenne pepper to suit your palate.
  7. Divide mussels in their half-shells between warm bowls, spoon sauce over mussels and serve immediately, with fresh crusty bread.


Ingredients prepared for the sauce

Flavourings for the mussel pan

Ingredients for the sauce

Ingredients for the sauce

Mussels ready to be steamed

Mussels ready to be steamed

Cooked mussels

Cooked mussels

Mussels on the half-shell

Mussels on the half-shell

Sauce before the parsley is added

Sauce before the parsley is added

Posted in Cooking | Tagged , , | Leave a comment

Nice-inspired mussels

Clean up alert! This dish generates numerous dishes, a large volume of detritus and, if you are not careful, a messy cooktop.

Moules chez nous

Moules chez nous

The inspiration for this dish came during a visit to Nice in December 2009.

We were on a coach tour of France and spent two nights in Nice.  In some free time one morning, we visited the renowned flower markets. Afterwards, we chose to have lunch at one of the many nearby seafood restaurants; one of my two dishes was a bowl of small French mussels served with a wonderful sauce.

The inspiration

The inspiration

We were already practised in preparing a meal of chilli mussels – a dish we still enjoy – so we felt confident that we could pull this dish off too. Indeed, this recipe does produce a result that has pleasing echoes of my experience in Nice. A critical step is to sauté the shallot and garlic slowly and for a decent length of time, long enough to try your patience! A sweet edge in your sauce, enhanced by the brandy, will reward your patience.

There will be enough mussels to feed two persons for lunch or four persons as an entrée. (Note to Australian readers: do NOT use the ubiquitous large green-lipped mussels. This is a delicate dish, for which we use smaller mussels available widely in the Melbourne region, harvested either at Mt Martha or Portarlington.)

In a follow-up post, I will provide some additional photos of the method.

Ingredients

generous pinch of saffron threads
1kg fresh mussels
1 tbsp olive oil
100g shallots, peeled and finely chopped
2 garlic cloves, finely sliced
4-6 thyme sprigs, bay leaf and 10 black peppercorns
1 tbsp brandy
salt and pepper
80ml thin cream
2 tbsp chopped parsley
cayenne pepper (optional)

Method

  1. Soak the saffron threads in a little boiled water.
  2. To prepare mussels for cooking, soak raw mussels in cold water for 10 minutes, scrub and remove the beard.
  3. Meanwhile, sauté the shallot and garlic in olive oil for at least 10 minutes over low heat in a saucepan.
  4. Place thyme sprigs, bay leaf and peppercorns in the base of a pan large enough to accommodate the mussels in no more than 2 layers. Add enough dry white wine to cover the bottom of the pan to a depth of 1cm.
  5. Seal with a tight-fitting lid (close any steam vents), turn heat to maximum and wait 5 minutes. Remove from heat, lift lid and remove all the mussels that have opened. Place the pan back on the heat for 2 minutes and discard any mussels that have not opened at this second attempt. Transfer the mussels to a large warm bowl, remove half of each shell and discard; keep the mussels just warm. Strain the cooking liquid into a bowl and discard the seasonings.
  6. Add brandy to the saucepan of shallot and garlic and cook off then add saffron threads and about 100ml of the reserved cooking liquid. Cook briefly, add more of the liquid to taste, say 60ml, adjust seasoning and simmer for 5 minutes. Add cream and parsley, bring back to simmer and remove from the heat. Add a couple of sprinkles of cayenne pepper to suit your palate.
  7. Divide mussels in their half-shells between warm bowls, spoon sauce over mussels and serve immediately, with fresh crusty bread.
Posted in Cooking, Travel | Tagged , , | Leave a comment

Lamb shank curry with palak paneer

Every Spring we make a curry using lamb shanks. Our most recent meal of this dish was notable for what we cooked to accompany the lamb – our first home-cooked palak paneer, albeit minus the paneer (an Indian style of cheese). Palak paneer is our favourite dish on the menu of Sampoorna, an Indian vegetarian restaurant only one kilometre from our home; we dine at Sampoorna at least three times a year with another couple, friends who live a few doors up the street.

Shank curry 5

So, back to the lamb shank curry. You will need to start work on this dish at least one, preferably two, days before you want to serve it.

Ingredients

4 medium “French-trimmed” lamb shanks, cut into two sections each
100g yoghurt
2 tsp garam masala
60ml vegetable oil
1 onion, halved and finely sliced
2 cloves garlic, finely sliced
1 tbsp grated fresh ginger
1 fresh bay leaf (or 2 dried bay leaves)
2 tbsp tomato paste
1 large potato, peeled and cut into chunks
1 medium carrot, peeled and cut into chunks
1 tsp sea salt

Spice mix
½ tsp ground turmeric (or a generous pinch of saffron threads)
1 tsp ground cinnamon
1 tsp ground coriander
1 tsp ground cumin
½ tsp chilli flakes
8 cardamom pods

Method

  1. Trim the shanks of excess fat, combine the yoghurt and garam masala and massage into the shanks. Refrigerate for 2 hours or, preferably, overnight.
  2. When you are ready to start cooking, heat the oven to 175C. Add 20ml of the oil to a roasting pan, place the pieces of lamb in the tray and roast the meat for 20 minutes, turning each piece after 10 minutes. Reserve pieces of lamb and reduce oven temperature to 140C.
  3. Meanwhile, heat remaining oil in a large flameproof casserole pot and sauté the onion and garlic until soft but not browned. Add the ginger, bay leaf and spice mix and cook for 3 minutes. Add tomato paste, salt and 400ml warm water and bring to a simmer.
  4. Add the browned lamb shanks to the pot, return to the boil, cover and transfer to the oven.
  5. Cook for 1½ hours or until the lamb is tender and the sauce is thick (adjust oven temperature so the sauce bubbles gently). Add potato and carrot chunks after 30 minutes
  6. Allow to cool, refrigerate overnight and remove excess fat from the surface. (You might have to remove some of the shanks to complete this step.)
  7. Reheat gently and serve with accompaniments according to your own preferences.

Shank curry 1   Shank curry 3

Adding the potato and carrot

Adding the potato and carrot

To make the palak paneer, I found a recipe on an English-language site written by an Indian woman. I have modified it a great deal to suit our pantry and cooking methods. We did enjoy how it turned out but I would like to test it a second time, with the addition of the paneer, before putting it in a post.

Posted in Cooking | Tagged , , , , | Leave a comment

Quail involtini – photos of the method

Here again is the method for the quail involtini, followed by some relevant photos

  1. Place the breadcrumbs and chestnuts in a bowl.
  2. Melt the butter in a small pan and sauté the garlic and shallot for 6 minutes. Remove from the heat, add to the bowl and mix well.
  3. Chop the herbs finely, add to the bowl, add the Marsala and mix well. Add salt and pepper to taste, going easy on the salt; prosciutto is coming!
  4. Lay one quail, skin side down, on a board or large plate, with a long side facing you. Lay two or three slices of prosciutto (depending on size) alongside and slightly overlapping each other on another plate.
  5. Take one fourth of the stuffing and spread it evenly along the quail flesh nearest to you. Now roll the quail and stuffing towards the opposite side, tucking in loose ends and spilled stuffing as you go.
  6. Place the rolled quail across one end of the prosciutto slices and roll it up, pressing gently on the prosciutto to seal gaps and edges as necessary.
  7. Lay the roll in the centre of one edge of a piece of lightly-oiled cooking foil that is at least 12cm wider than the length of the rolled quail and sufficiently long to wrap around the circumference of the roll one and a half times. Roll it all up and twist the two surplus ends of the foil as for a bonbon.
  8. Preheat oven to 180C.
  9. Place all four ‘bonbons’ on a baking tray and place them in the oven for 15 minutes. Remove the tray from the oven and carefully remove the foil; place the rolled quail back on the tray.
  10. Combine the oil, vinegar and honey in a bowl. Brush each quail generously with the glaze, return to the oven, using the second highest shelf. Remove from the oven when the glaze has browned lightly and the prosciutto is just crisp – about 7-8 minutes.
  11. Rest the quail for up to 10 minutes before slicing to serve.
Garlic, shallots and chestnuts prepared for steps 1 and 2

Garlic, shallots and chestnuts prepared for steps 1 and 2

Chopped herbs to be added to the stuffing

Chopped herbs to be added to the stuffing

Quail wrapped in prosciutto

Rolled quail wrapped in prosciutto – step 6

Step 7 - the finished bonbons!

Step 7 – the finished bonbons!

Step 10 completed - ready to rest, slice and serve

Step 10 completed – ready to rest, slice and serve

Posted in Cooking | Tagged , , | Leave a comment

Quail involtini

Quail involtini 8

This is a recipe we vowed to try after we bought Patrizia Simone’s wonderful cookbook, My Umbrian kitchen. For our first attempt, Maggie even applied herself to the task of deboning two quails using Patrizia’s instructions. Afterwards, she thought she might let a butcher do it next time but the dish was so wonderful that she had second thoughts!

Last weekend was the occasion of the annual final of the main Australian-rules football competition, which is always held at the vast Melbourne Cricket Ground on the last Saturday in September. Unless we have the good fortune to be out of the country, we watch the event at home, unaccompanied, and treat ourselves to some fine wines and delicious bites of food.

This year, we decided to prepare FOUR  quail involtini the day before, enjoy one each warm with side dishes for our evening dinner, and have some more the next day. (As it turned out, we had over-catered for Saturday – like that hardly ever happens! – so the leftover quail found its way into work-day salad lunches on Monday.)

Four quail, so no in-house boning. Friday morning’s weather was pleasant, so we set off on a shopping-for-food outing that took us to our favourite greengrocer, Toscano’s; then to Donati’s Fine Meats in Carlton to collect the boned quail I had ordered; and finishing with a long-overdue visit to Mediterranean Wholesalers in Brunswick, for prosciutto, speck, ham, anchovies and some bread suitable for making bruschetta.

Come 4pm, it was time to begin the preparation of the quail and some side dishes. By 7pm, we were two very happy diners!

The recipe provided below reflects numerous changes we have made to Patrizia’s ingredients and method based on our two experiences.  However, we wouldn’t have got very far without the original recipe.

You definitely need patience and attention to detail to produce this dish successfully but you will be amply rewarded with superb flavours and textures. A follow-up post will provide a series of photos of the method, to help you visualise the various tasks.

Ingredients

4 quails, boned
80g breadcrumbs, made from day-old bread
50g peeled, roasted chestnuts, finely sliced (the aim is to retain a little texture of nut) (you could substitute roasted hazelnuts for the chestnuts but you would need to grind them to a coarse meal)
30g butter
1 clove garlic, finely chopped
1 French shallot, finely chopped
4-6 sage leaves
leaves from 2 tender sprigs of rosemary
leaves from a large sprig of thyme
1-2 fennel fronds or a few crushed fennel seeds
25ml Marsala
salt and pepper
8-12 slices prosciutto
1½ tsp each of olive oil, balsamic vinegar and honey

Method

  1. Place the breadcrumbs and chestnuts in a bowl.
  2. Melt the butter in a small pan and sauté the garlic and shallot for 6 minutes. Remove from the heat, add to the bowl and mix well.
  3. Chop the herbs finely, add to the bowl, add the Marsala and mix well. Add salt and pepper to taste, going easy on the salt; prosciutto is coming!
  4. Lay one quail, skin side down, on a board or large plate, with a long side facing you. Lay two or three slices of prosciutto (depending on size) alongside and slightly overlapping each other on another plate.
  5. Take one fourth of the stuffing and spread it evenly along the quail flesh nearest to you. Now roll the quail and stuffing towards the opposite side, tucking in loose ends and spilled stuffing as you go.
  6. Place the rolled quail across one end of the prosciutto slices and roll it up, pressing gently on the prosciutto to seal gaps and edges as necessary.
  7. Lay the roll in the centre of one edge of a piece of lightly-oiled cooking foil that is at least 12cm wider than the length of the rolled quail and sufficiently long to wrap around the circumference of the roll one and a half times. Roll it all up and twist the two surplus ends of the foil as for a bonbon.
  8. Preheat oven to 180C.
  9. Place all four ‘bonbons’ on a baking tray and place them in the oven for 15 minutes. Remove the tray from the oven and carefully remove the foil; place the rolled quail back on the tray.
  10. Combine the oil, vinegar and honey in a bowl. Brush each quail generously with the glaze, return to the oven, using the second highest shelf. Remove from the oven when the glaze has browned lightly and the prosciutto is just crisp – about 7-8 minutes.
  11. Rest the quail for up to 10 minutes before slicing to serve.

The photos below show the involtini after the cooking was finished and a side dish of garlic, mushroom, brown shallot and potato slices, scattered with extra herbs, seasoning and olive oil. We also prepared a salad of young spinach leaves, toasted walnuts and vinaigrette dressing.

Quail involtini 7   Quail involtini 6

Posted in Cooking | Tagged , , | Leave a comment

Other Peninsula pleasures

This post is a prequel to Out of town, out to lunch.

One of the main strengths of the Mornington Peninsula as a destination for holiday-makers and day-trippers is the wide range of attractions and recreational opportunities.

These include safe, clean bayside beaches; rugged oceanside back beaches with waves for surfers – my son, Julian is a regular visitor – and rockpools for the curious; the many wineries; coastal walk trails and national parks; horse-riding, for novices and pros alike; Victoria’s biggest strawberry farm; cheese producers; and so on.

On our recent visit, we decided to take advantage of the idyllic Spring weather and visit Point Nepean National Park for the first time. As recently as the 1990s, this area was controlled by the Australian armed forces. A large quarantine station had been established from 1852 onwards, to cope with the disease risks associated with the huge influx of migrants that was initially triggered by the Victorian gold rushes. About 50 buildings, of various shapes and purposes, are still intact and are gradually being restored. The area also became home to a series of small forts, installed with guns from the 1880s onwards to ward off enemy ships in the event of hostilities; in fact, the first shots fired by British allies in the first world war were fired here to prevent a german merchant vessel from leaving Port Phillip Bay.

Most of this was new information for Maggie and me, as were the views from Point Nepean itself, across The Rip – the narrow safe passage into the bay – towards Point Lonsdale. We will definitely go back there soon to explore more widely. To learn more, visit http://parkweb.vic.gov.au/explore/parks/point-nepean-national-park

Point Nepean

Point Nepean, looking across The Rip

One of the best known attractions on the peninsula is the Red Hill Market, the largest regular craft market in Victoria. This event is held at a large outdoor recreation complex on the first Saturday of each month, from September to May.

So, as we were booked to have lunch at Paringa Estate on Saturday 6 September, we decided to spend at least an hour at the market beforehand. On previous visits, I had found the vast majority of stalls to be of little personal interest; after all, I usually go to an outdoor market to buy supplies for our kitchen. Amazing isn’t it, the way grandchildren change the way you look at craft stalls? (However, I still can’t come at organic soy candles!)

One stall that we found attractive was Red Earth Toys, operated by Laurie & Trish Simmons from Omeo, one of Victoria’s more remote towns. While Maggie browsed, I focused on the wooden tool boxes, each complete with seven wooden tool-facsimiles, all made neatly from lightweight wood. 10 minutes later, we had possession of a perfect present for each young son of Maggie’s two children.

You can find Red Earth Toys on faceBook.

Toolboxes for grandsons

Toolboxes for grandsons

We then returned to a stall that we had noticed soon after we arrived, Bloss Decor, whose products include handcrafted wooden blocks, adorned in various ways including the letters of children’s names.

Here is what we ordered for our two youngest grandchildren, aged eight months and five months, respectively. Bloss Decor can also be found on faceBook. Thank you Stephanie!

IMG_0257   IMG_0262

On a not-at-all-serious note, look casually at the next two photos. What are these people doing in full public view? Oh, it’s NOT a portable urinal, it’s a mobile ATM! With two machines!

That alone tells you how popular the Red Hill Market is.

Market ATM 2   Market ATM 1

Posted in Travel | Tagged , , | Leave a comment

A flavoursome banana cake

Is a banana cake worthy of a blog post? After all, it is common, everyday fare and cyberspace is home to hundreds of recipes already. And, in Australia at least, commercial versions are widely available, in supermarkets, cake shops and instant-bread bakeries, while homemade product is a stock-standard item at church fetes and main street charity cake stalls … and then there are all the banana muffins!

Well, we grow tonnes of good quality bananas in Australia, a banana cake was the first cake I made as an adult, more than 30 years ago, and my evolved recipe does produce a cake that is satisfyingly flavoursome, complex even. So there! Here it is.

Ingredients

125g butter, chopped and softened
180g sugar (dark brown with walnuts, raw with pecans)
40ml plain yoghurt
400g ripe bananas, peeled and gently mashed
2 large eggs
1 tsp mixed spice
few drops of vanilla essence
225g self raising flour, sifted
100g nuts (walnut or pecan) coarsely chopped
50g pitted dates, chopped

Method

  1. Line the base of a round 20cm-diameter cake tin with baking paper.
  2. Preheat oven to 165C.
  3. Using an electric mixer, beat sugar and butter until pale and creamy.
  4. Beat in yoghurt and bananas well. Add eggs, vanilla and spices and beat in well.
  5. Fold in flour. Remove from electric mixer and fold in nuts (and dates).
  6. Pour in to the cake tin.
  7. Bake in oven for about 45 minutes, until a cake skewer tests clean.
  8. Cool in tins for 7 minutes then turn out onto a cake rack.

Banana cake 1   Banana cake 2

Posted in Cooking | Tagged , , | 1 Comment